Are you looking for How to Create a Bootable USB Drive but unsure where to start? Look no further! In this step-by-step guide, we will walk you through the process of making a bootable USB drive with ease.
Creating a bootable USB drive is a convenient way to install an operating system. Whether you need to install a new operating system (Windows 11,Windows 10,Windows 7), recover data from a damaged computer, or troubleshoot software issues, a bootable USB drive can save the day. This comprehensive guide will walk you through the steps required to make a bootable USB drive, ensuring that you can easily tackle any installation or recovery tasks.
You May Also Read
- How to Use Free Wifi Tips and Tricks
- How to Identify Fake Currency Notes
- How to Connect Any WiFi Without Password
- The Best Translation App For Android Mobile
- Best Application to Watch Live Cricket On Android
- Best Free VPN For Mobile and Computer
- Who is Using Your Wifi?
What is a Bootable USB Drive?
A bootable USB drive, also known as a bootable flash drive or a live USB drive, is a portable storage device that contains an operating system or software that can be executed independently from the computer’s internal hard drive. It allows you to boot your computer directly from the USB drive, bypassing the need for the installed operating system.
Why Do We Need a Bootable USB Drive?
A bootable USB drive can come in handy for various reasons. Here are a few common scenarios where having a bootable USB drive can be beneficial:
- Installing a new operating system.
- Recovering data from a non-booting computer.
- Repairing or troubleshooting software issues.
- Running diagnostic tools for hardware testing.
- Creating a portable workspace with your preferred applications and settings.
Things to Know Before Creating a Bootable USB
Before creating a bootable usb followings are the some important things to consider.
System Requirements for Creating a Bootable USB Drive
Before creating a bootable USB drive, ensure that your computer meets the following requirements:
- Sufficient free storage space on the USB drive
- Internet access (for downloading bootable content)
- Administrator access (for some methods)
Choosing the Right USB Drive
To create a reliable and functional bootable USB drive, it’s essential to choose the right USB drive. Consider the following factors when selecting a USB drive:
Capacity:
Ensure that the USB drive has enough space to accommodate the bootable content.
Speed:
Opt for a USB 3.0 or USB 3.1 drive for faster data transfer rates.
Durability:
Choose a USB drive that is sturdy and reliable for long-term usage.
Obtaining Bootable Content
To create a bootable USB drive, you need to obtain the bootable content, which can vary depending on your specific needs. Here are a few common sources of bootable content:
Operating System ISO:
If you want to install a new operating system, you can download the ISO file from the official website of the respective operating system such as Microsoft or Linux.
Click on the following buttons to download your desired OS.
Utility Software:
Certain software applications, such as disk cloning or partitioning tools, offer bootable versions that can be used for specific tasks.
Once you have identified the required bootable content, download it to your computer in a location that is easily accessible.
How to Create Bootable USB
In this ultimate guide we will share two methods to create bootable usb.
How to Create Bootable USB Using Power ISO
How to Create Bootabel USB Using Rufus
Creating Bootable USB Using PowerISO
What is PowerISO?
PowerISO is a popular software utility that enables users to manage and manipulate disc image files. It supports various formats, including ISO, BIN, NRG, and more. PowerISO offers an intuitive interface and a range of powerful features, making it an ideal choice for creating bootable USB drives.
Why Use PowerISO to Create a Bootable USB Drive?
PowerISO offers several advantages for creating bootable USB drives:
User-friendly interface:
PowerISO provides a simple and intuitive interface, making it easy for both beginners and experienced users to create bootable USB drives.
Wide format support:
PowerISO supports various disc image formats, allowing you to work with different ISO files.
Versatile functionality:
In addition to creating bootable USB drives, PowerISO offers a range of features, including image editing, conversion, and virtual drive creation.
Prerequisites:
Before you begin creating a bootable USB drive using PowerISO, ensure you have the following:
- A USB flash drive with sufficient capacity (at least 4GB for most operating systems).
- The ISO file of the operating system or diagnostic tool you want to make bootable. Ensure the ISO file is compatible with PowerISO.
Step-by-Step Guide:
Follow these steps to create a bootable USB drive using PowerISO:
Step 1: Download and Install PowerISO
Click on the button below to download PowerISO.
Once the download is complete, run the installer file and follow the on-screen instructions to install PowerISO on your computer.
Step 2: Obtain the Bootable Content
Before you can create a bootable USB drive, you need to have the bootable content, such as an ISO file, ready on your computer. Make sure you have the necessary ISO file or disk image downloaded and saved in a location that is easily accessible.
Step 3: Launch PowerISO
Launch PowerISO by right-clicking on its desktop icon or locating it in your Start menu and run with administrative privileges.
Step 4: Create a Bootable USB Drive
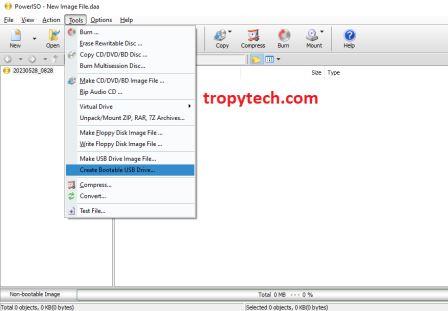
In the PowerISO main window, click on the “Tools” menu and select the “Create Bootable USB Drive” option.
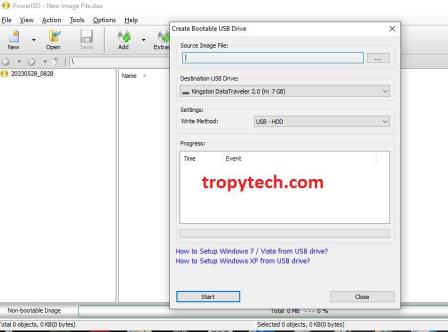
The “Create Bootable USB Drive” dialog box will appear.
In the “Source Image File” field, click on the folder icon and navigate to the location where you have saved the bootable content (ISO file or disk image).
In the “Destination USB Drive” section, select the USB drive you want to make bootable. Make sure you choose the correct USB drive as all data on it will be erased.
Choose the “USB-HDD” option from the “Bootable USB drive using” drop-down menu.
Check the box next to “Format” to format the USB drive during the bootable USB creation process.
Click on the “Start” button to begin the bootable USB creation process.
Step 5: Wait for the Process to Complete
PowerISO will format the USB drive (if selected) and then copy the bootable content onto the USB drive.
The progress of the process will be displayed in the PowerISO window. Wait for the process to complete.
Step 6: Safely Eject the USB Drive
Once the bootable USB drive creation process is finished, PowerISO will display a completion message.
Safely eject the USB drive from your computer. Right-click on the USB drive icon in your file explorer and select the “Eject” option.
Creating Bootable USB Using Rufus
What is Rufus?
Rufus is a free and open-source tool that allows you to create bootable USB drives. It is widely known for its simplicity, speed, and compatibility with various operating systems and ISO image files. Rufus supports both legacy BIOS and UEFI systems, making it a versatile solution for creating bootable media.
Why Use Rufus to Create a Bootable USB Drive?
Rufus offers several advantages over other tools when it comes to creating bootable USB drives:

User-friendly interface:
Rufus provides an intuitive interface that guides you through the process step by step.
Wide compatibility:
Rufus supports a broad range of ISO images and operating systems, making it a reliable choice for different installation and recovery scenarios.
Fast and reliable:
Rufus is known for its speed and reliability in creating bootable USB drives, allowing you to complete the process quickly and efficiently.
Prerequisites
- Before you begin creating a bootable USB drive using Rufus, ensure you have the following:
- A USB flash drive with sufficient capacity (at least 8GB for most operating systems).
- The ISO image file of the operating system or diagnostic tool you want to make bootable. Ensure the ISO is compatible with Rufus.
Step-by-Step Guide:
Follow these steps to create a bootable USB drive using Rufus:
Step 1: Downloading Rufus
Click on the button below to download Rufus.
Step 2: Inserting the USB Drive
Insert the USB flash drive into an available USB port on your computer.
Step 3: Launching Rufus
Run the Rufus application you downloaded in.
Locate the downloaded Rufus application on your computer and launch it by double-clicking the executable file.
Step 4: Selecting the USB Drive and ISO Image
In the Rufus interface, you will see a drop-down menu labeled “Device.” Click on it and select your USB drive from the list of available devices.
Next, locate the “Boot selection” section and click on the small disk icon to browse and select the ISO image file you want to make bootable.
Step 5: Choosing the Partition Scheme and Target System Type
Under the “Partition scheme” option, you can choose between MBR (Master Boot Record) and GPT (GUID Partition Table) depending on the target system’s requirements. If you’re unsure, MBR is generally compatible with most systems.
In the “Target system” section, select the appropriate option based on the operating system or tool you are creating the bootable USB for. Options include BIOS or UEFI.
Step 6: File System and Cluster Size Selection
Leave the “File system” option as “FAT32” unless you have a specific reason to choose otherwise.
The “Cluster size” should be set to “Default” unless you need to customize it for specific requirements.
Step 7: Bootable Disc Creation Process
Once you have selected the appropriate settings, click on the “Start” button to begin the bootable USB creation process.
Rufus may display a warning that all data on the USB drive will be destroyed. Ensure you have backed up any important data before proceeding.
Rufus will now format the USB drive and copy the contents of the ISO image onto it. The process may take a few minutes, depending on the size of the ISO file and the speed of your USB drive.
Step 8: Completing the Process
Once the process is complete, Rufus will display a “READY” message. You can safely close Rufus and eject the bootable USB drive from your computer.
Conclusion
Creating a bootable USB drive is a valuable skill that can assist you in various computing scenarios. Whether you need to install an operating system, troubleshoot software issues, or recover data, having a bootable USB drive can save time and effort. By following the step-by-step instructions provided in this guide, you now have the knowledge and tools to create your own bootable USB drive. Remember to choose the appropriate method, select the right software, and ensure compatibility with your computer. With a bootable USB drive at your disposal, you’ll be well-prepared to tackle any computing challenge that comes your way.
How can I create a bootable USB drive on Windows?
: There are several methods to create a bootable USB drive on Windows. You can use built-in tools like Command Prompt or third-party software like Rufus or PowerISO. Follow the step-by-step instructions outlined in this guide for detailed guidance.
What is the recommended USB drive capacity for creating a bootable drive?
The required capacity depends on the size of the bootable content. For most operating systems, a USB drive with a capacity of 8GB or more should suffice. However, if you plan to include additional software or data, consider using a larger capacity USB drive.
Can I use a bootable USB drive to install multiple operating systems?
Yes, you can create a multiboot USB drive that allows you to install multiple operating systems.
Can I create a bootable USB drive from an ISO file?
Yes, creating a bootable USB drive from an ISO file is one of the common methods. You can use software like Rufus, PowerISO, or the built-in tools in Windows or Mac to copy the contents of the ISO file onto the USB drive and make it bootable. Make sure to select the ISO file as the source when creating the bootable USB drive.
How do I update the bootable content on my USB drive?
To update the bootable content on your USB drive, you will need to repeat the process of creating a bootable USB drive with the updated content. Follow the steps mentioned earlier in this guide to format the USB drive, obtain the updated bootable content, and use either the Command Prompt or third-party software to copy the updated content onto the USB drive.
Can I use a bootable USB drive on any computer?
In most cases, you can use a bootable USB drive on any computer that supports booting from USB devices. However, some older computers may not have this capability. Additionally, certain computers may require you to change the boot order in the BIOS or UEFI settings to prioritize the USB drive. It’s always a good idea to check the computer’s documentation or manufacturer’s website to ensure compatibility.
How can I make my bootable USB drive more secure?
To enhance the security of your bootable USB drive, you can consider the following measures:
Use strong and unique passwords for any operating systems or encrypted files contained within the USB drive.
Enable encryption for the USB drive to protect the contents in case of loss or theft.
Regularly update the bootable content to ensure you have the latest versions and security patches.
Store the USB drive in a safe and secure location when not in use.
Avoid using untrusted or unknown bootable content sources to reduce the risk of malware or malicious software.
Does PowerISO support all types of ISO files?
PowerISO supports various disc image formats, including ISO, BIN, NRG, and more. However, it’s always recommended to check the compatibility of the ISO file with PowerISO before proceeding.
Can I use a USB drive with existing data?
No, creating a bootable USB drive with PowerISO requires formatting the USB drive, which will erase all existing data. Make sure to back up any important files before proceeding.
Is PowerISO a free tool?
PowerISO offers a free trial version with limited functionality. To access all the features and remove limitations, you will need to purchase a license.
Can I use Rufus with all types of ISO files?
Rufus supports a wide range of ISO files, including those for various operating systems and diagnostic tools. However, it’s always a good idea to check the compatibility of the ISO file with Rufus before proceeding.